File resolution is something that doesn’t come to mind when we create a document. Well, no big deal. Because it’s very easy to change resolution in Adobe Illustrator and I’ll show you the different methods in this tutorial.
Most of the time many of us only focus on the document size and color mode then we adjust the resolution depending on how we’re going to use the artwork.
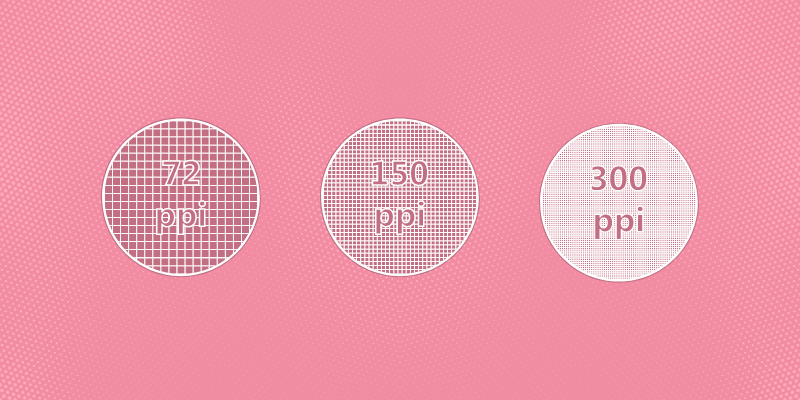
For example, if you’re using the design online, the screen resolution (72 ppi) works perfectly fine. On the other hand, if you want to print out the artwork, you’d probably want to go for a higher resolution (300 ppi).
Notice I said ppi instead dpi? Actually, you’ll not see the dpi option in Adobe Illustrator no matter when you create a document, change raster settings, or export an image as a PNG. What you’ll see instead is ppi resolution.
So what’s the difference between DPI and PPI?
DPI vs PPI
Are dpi and ppi the same in Adobe Illustrator? While both dpi and ppi define image resolution, they are not the same.
DPI (Dots Per Inch) describes the amount of ink dots on a printed image. PPI (Pixels Per Inch) measures the resolution of a raster image.
In short, you can understand it as dpi for print and ppi for digital. A lot of people use them interchangeably, but if you want to optimize your print or digital artwork, you should understand the difference.
Anyways, Adobe Illustrator only allows you to adjust the ppi resolution. Let me show you how it works!
Note: all screenshots from this tutorial are taken from Adobe Illustrator CC Mac version. Windows or other versions can look different. When using keyboard shortcuts, Windows users change the Command key to the Ctrl key.
How to Change PPI Resolution in Adobe Illustrator
If you already know what you’re using the design for, you can set up the resolution when you create the document. But I know it’s not always the case. As I talked about earlier, the resolution isn’t always the first thing to come to mind.
Luckily, you can change the resolution as you work without having to create a new document, or simply change the resolution when you save or export the file.
I’ll show you where to change the resolution in Adobe Illustrator in each situation below.
Changing the resolution when you create a new document
Step 1: Open Adobe Illustrator and go to the overhead menu File > New or use the keyboard shortcut Command + N to create a new document.
Step 2: Go to the Raster Effects option to change the resolution. If it doesn’t show you the option, click Advanced Options to expand the folded menu and you should see it.
Changing the resolution of an existing document
Step 1: Go to the overhead menu Effect > Document Raster Effects Settings.
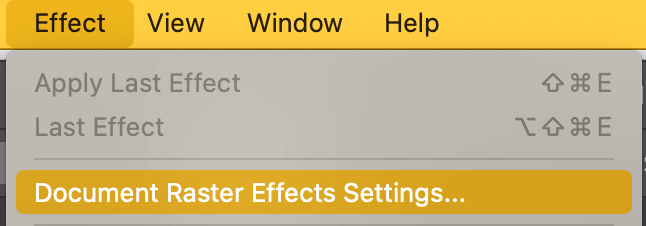
Step 2: Choose a ppi option from the Resolution setting and click OK.
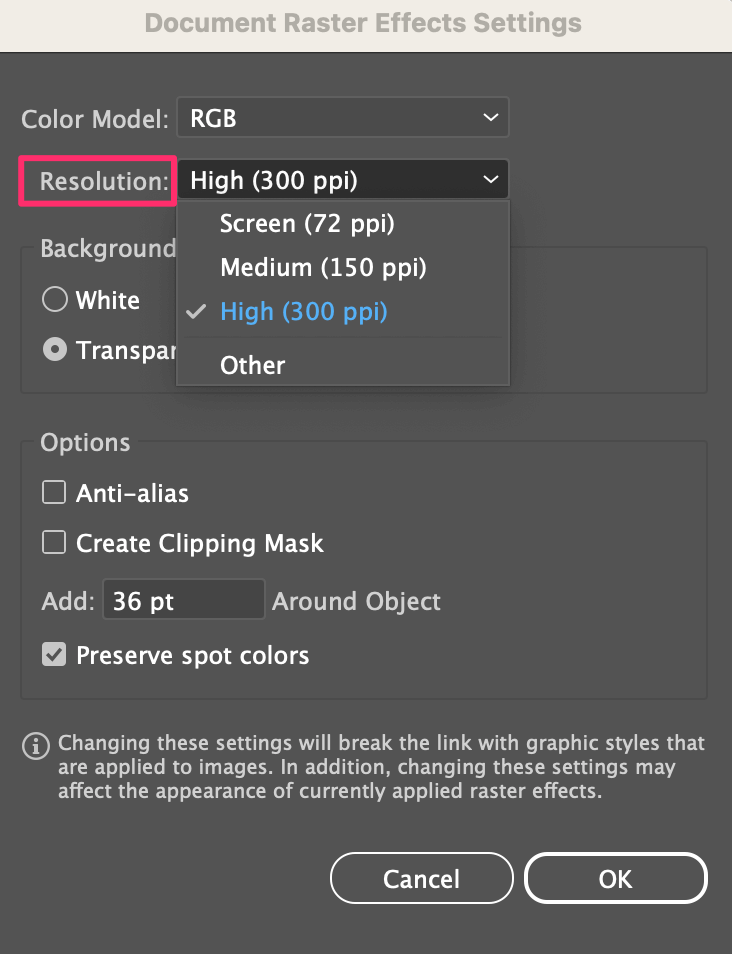
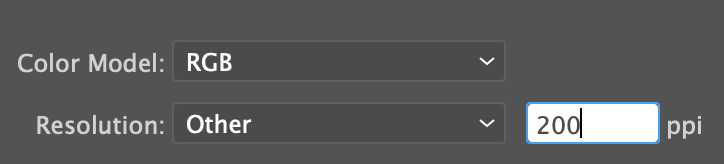
You can also choose Other and type in a custom ppi value, for example, if you want an image with 200 ppi, you can choose Other and type in 200.
Changing the resolution when you export a file
Step 1: Go to File > Export > Export As.
Step 2: Choose where you want to save your exported image, name it, choose a file format, and click Export. For example, I chose the png format.
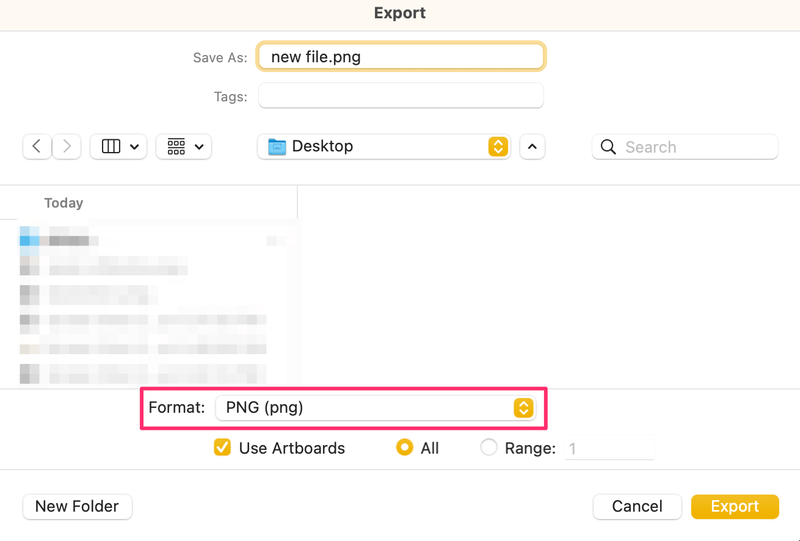
Step 3: Go to the Resolution option and change the resolution.
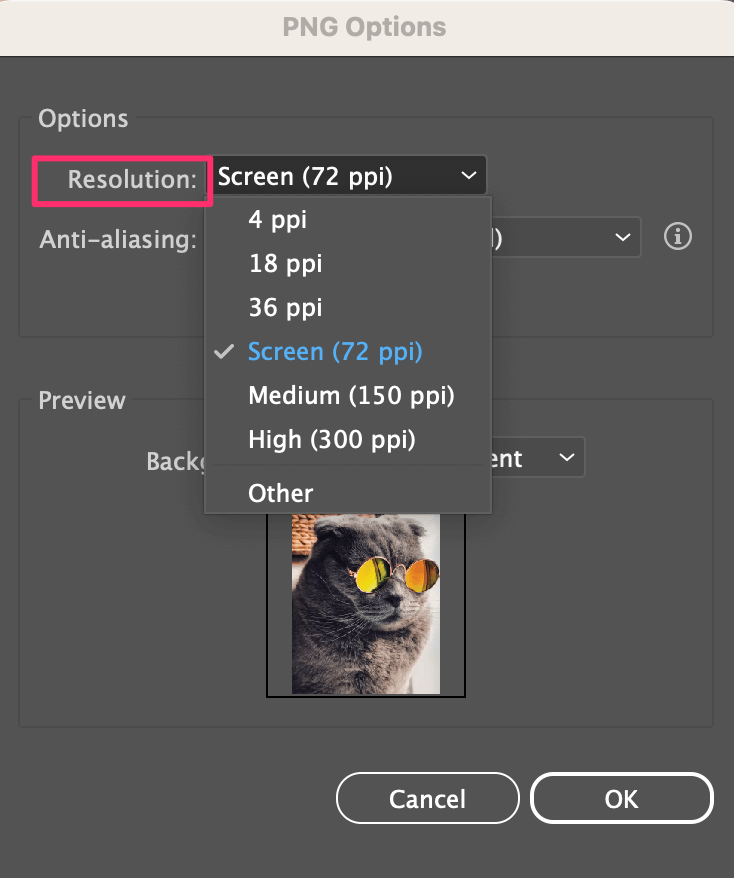
Where the resolution setting is located depends on the format you choose. For example, if you export the file as a jpeg, the options window is different.

That’s it. Setting up the ppi resolution, changing the ppi as you work, or changing the resolution when exporting, you’ve got it all.
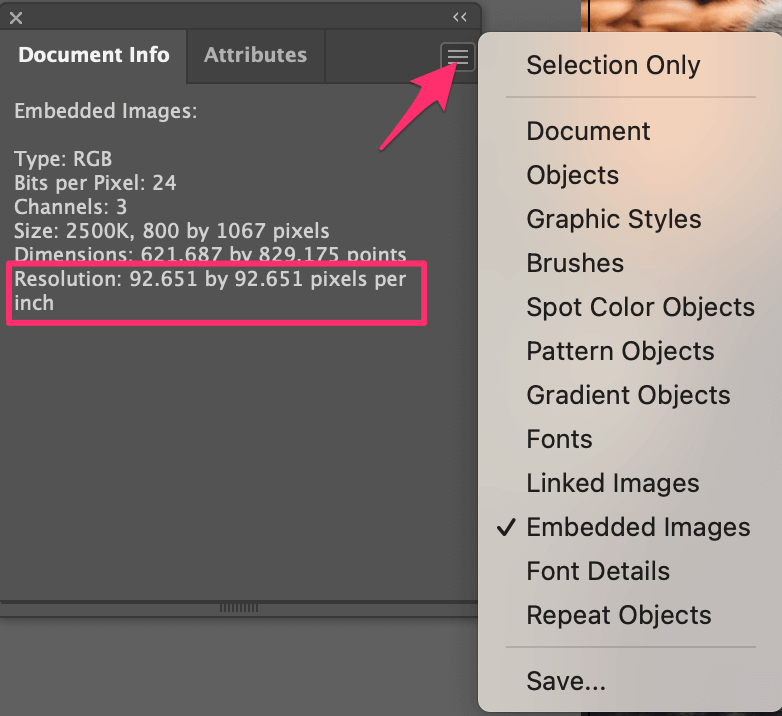
If you’re not sure how to check the resolution of an image in Illustrator, here’s how.
Go to the overhead menu Window > Document Info and you’ll see the resolution.
If you have the Selection Only option unchecked, it’ll show you the resolution of everything. If you want to see the resolution of a specific object or image, click on the folded menu and choose an attribute, the resolution will show accordingly.
Conclusion
When you change image resolution in Adobe Illustrator, you’ll be looking at the ppi resolution instead of dpi. No more confusion! This tutorial should cover everything you need to know about changing resolution at any point in Adobe Illustrator.
todd
Hi June, i have been designing for 30 years, an older hand. The issue here is that if you place a image at 100% 300dpi into illustrator, and scale it 50%, the image size is smaller, but the image resolution should be double 300dpi, to 600dpi. Illustrator does not provide the same level of detail as say indesign which clearly shows this relationship between size and resolution. If you have any ideas on this, it would be great to get your reply.
June Escalada
Hi Todd,
Thanks for pointing that out. Now I’m curious to dig in a bit more. I’ll look into that.
Margot
superhelpful! <3
June Escalada
That’s great!
Gabriel
Very helpful. Thanks.