If you want to transform a shape by swiping over, the Eraser tool is the go-to. However, you often need to change the eraser size based on the shape you work on.
For example, if you make the eraser bigger, you can have smoother edges. On the other hand, a smaller eraser allows you to work on details.
Some of you might’ve already tried changing the stroke size but saw no changes in the eraser size. That’s the wrong way to go because the eraser doesn’t have strokes.
The Eraser tool in Adobe Illustrator doesn’t work the same way as the Eraser in Photoshop, in which you could remove anything you erase. In Adobe Illustrator, the eraser is a vector editing tool that only works on paths that contain anchor points.
So how does it work?
In this tutorial, you’ll find two quick and easy ways to change the eraser size in Adobe Illustrator.
2 Ways to Change Eraser Size in Adobe Illustrator
The quickest way to change the eraser size in Adobe Illustrator is by using the keyboard shortcut – the left and right brackets! You can also change the eraser size, roundness, or angle from the Eraser Tool Options settings.
Follow the steps below to see how it works!
Note: The screenshots from this tutorial are taken from Adobe Illustrator CC Mac version. Windows or other versions can look different.
Method 1: Eraser Tool Options
Step 1: Double click on the Eraser tool on the toolbar, and it’ll open up the Eraser Tool Options setting window.
Step 2: Adjust the size and click OK. Move the size slider left to make the eraser size smaller and move it right to make the eraser size bigger.
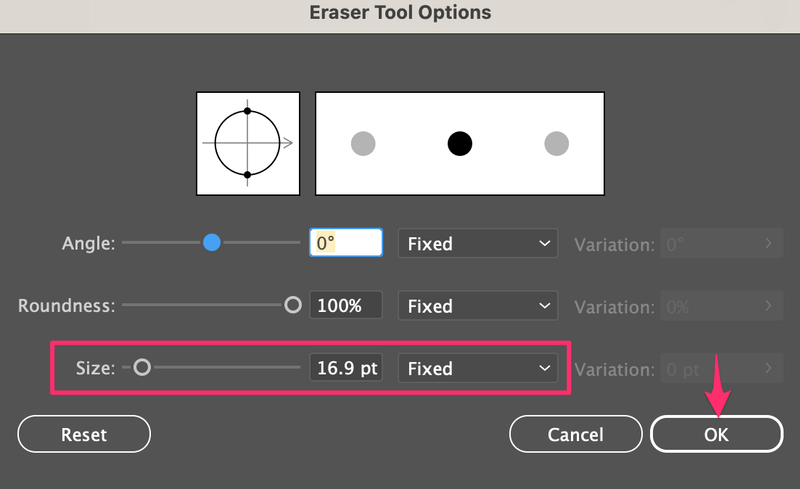
You can also adjust the eraser angle or roundness if needed.
Method 2: Keyboard shortcut
As I mentioned earlier the keyboard shortcut to change eraser size is the left and right bracket keys ([ and ]).
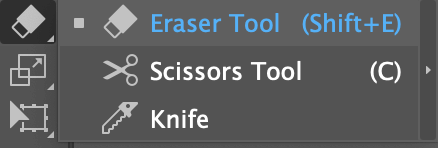
Simply choose the Eraser tool (keyboard shortcut Shift + E) from the toolbar, then press the left bracket [ to decrease the eraser size and right bracket ] to increase the eraser size.
FAQs
Here are more questions related to the Eraser tool in Adobe Illustrator.
How to fix the Eraser tool in Adobe Illustrator?
The Eraser tool in Adobe Illustrator can only edit vectors with anchor points, so you need to make sure that the object you’re trying to erase is an editable vector.
There are several reasons why the eraser isn’t working in Illustrator. For example, it wouldn’t work on the live text, raster images, locked objects, etc. Depending on the reason, the solution can be vectorizing the object, or simply unlocking objects.
Why does the Eraser tool have outlines in Adobe Illustrator?
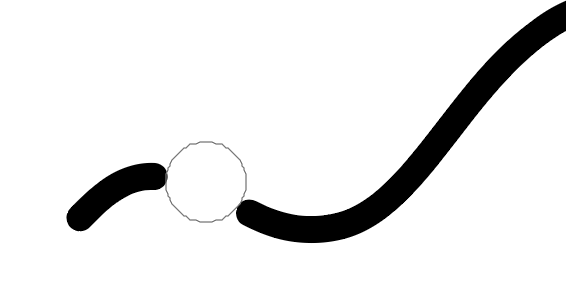
The Eraser tool in Adobe Illustrator doesn’t remove objects or paths entirely, instead, it transforms the objects.
When you’re trying to erase a rectangle, you’ll probably see something like this. It didn’t erase the path you erased through, instead, it created an outline and added more anchor points.

If you want to cut a path, the Scissors tool can be a better option.
How to erase part of an image in Adobe Illustrator?
Depending on how you want to erase and what you’re trying to erase, there are different tools for erasing or cutting parts of an image in Illustrator. Generally, you can use the Transparency panel and Paintbrush tool to make a mask or use the Pen tool and make a clipping mask.
Conclusion
You can use either method I mentioned in this tutorial to make your eraser bigger or smaller. If you don’t need to change other eraser settings like roundness or angle, then using the bracket keys is the best way to change the eraser size, because you adjust the size freely as you work.