I know people always say that InDesign is best for creating layouts or handling text, but if it’s just one small detail, sometimes I don’t bother to switch programs. And since I found the Area Type Tool, I barely use InDesign unless I need to design multiple pages layouts.
If you don’t know what the Area Type Tool in Illustrator is, here’s a quick explanation:
The Area Type Tool (also known as paragraph type) in Adobe Illustrator allows you to wrap text inside a shape.
But no, it’s not the same as warp text, because you can control the spacing between the shape and text, and you can insert paragraphs without distorting the text using the Area Type Tool.
I know, a common way to fill a shape with text is using the Envelope Distort > Make with Top Object command, but the result is totally different from adding text to shapes using the Area Type Tool.
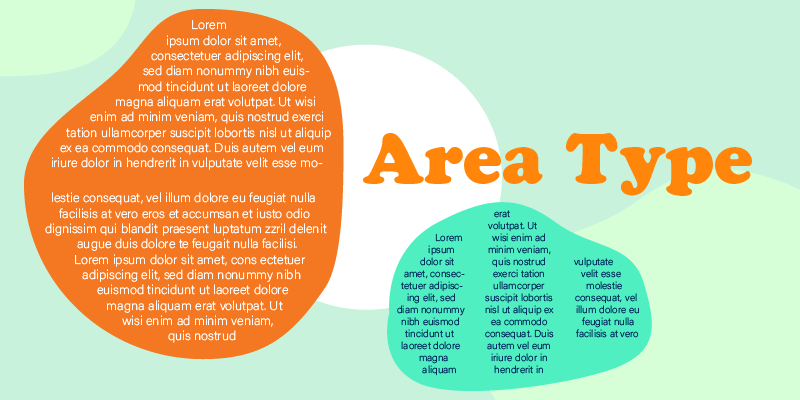
To help you understand the difference better, here’s a comparison of what both effects look like.

See the difference? The Area Type Tool doesn’t distort the text inside the shape, and there’s more you can do, such as adding columns and rows. I’m going to get into the details in the tutorial below.
First thing first, you need to find where the tool is.
Note: The screenshots from this tutorial are taken from Adobe Illustrator CC Mac version. Windows or other versions can look different. Keyboard shortcuts are also from Mac. Windows users change the Command key to Ctrl and the Option key to Alt.
Where is the Area Type Tool in Illustrator
The Area Type Tool is on the same menu as the Type Tool, if you click and hold on the Type Tool on the toolbar, you’ll see the Area Type Tool.
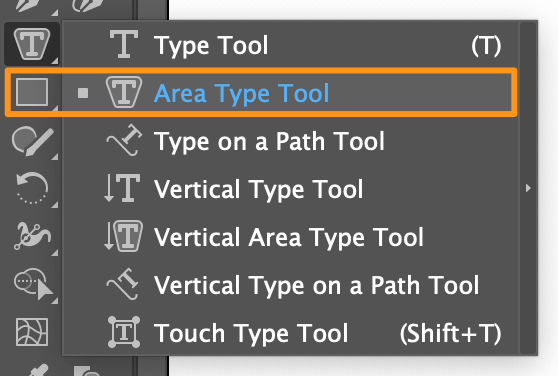
If these are not the options you see, that’s because you’re using the basic toolbar. No wonder you can’t find the Area Type Tool in Illustrator. Luckily, you can easily fix that.
You can switch the basic toolbar to the advanced toolbar from the overhead menu Window > Toolbars > Advanced.

Whenever you want to change back to the basic toolbar, go back to Window > Toolbars and choose Basic.
Found the Area Type Tool? Let me show you how it works!
How to Use the Area Type Tool in Illustrator
As you can see above, you can use the Area Type Tool to fill a shape with text, and you can also add columns and rows to space the paragraphs. Here’s how it works.
Step 1: Use any shape tools to create a shape. If you use the Pen Tool to draw a shape, make sure it’s a closed shape, meaning the first and last anchor points should be joined.
For example, I used the Pen Tool to create this random shape.

Duplicate the shape if you want to have the shape in the background because when you use the Area Type Tool, even though it fills the shape, it will not keep the shape color or outline.
You can simply copy the shape (keyboard shortcut Command + C), and paste it in place (keyboard shortcut Command + F).
Step 2: Choose the Area Type Tool from the toolbar. There isn’t a shortcut key for the Area Type Tool so you can only select it from the toolbar.
Step 3: This is the key step! Click on the path of the shape you create to add the area type, NOT inside the shape.

Once you click, you’ll see paragraph text inside the shape. You can replace the text with your own content that you want to fit in the shape. As you can see the text is already selected, so all you need to do is copy your own text and paste it.

Well, that doesn’t like nice. So the next step is to add some space between the text and shape.
Step 4: With the text selected, double-click on the Area Type Tool on the toolbar, and it will open the Area Type Options dialog.

If you only want to add spacing between the shape and text, simply increase the Inset Spacing value.

Now your text is no longer stuck to the edge.

If you want to divide the paragraph with columns and rows, simply set the numbers of columns and rows you want to add.

Once you’re happy with the format, click OK and that’s it!
Feel free to change the text color, font, and paragraph style on the Properties panel.

FAQs
Want to learn more about working with text in Adobe Illustrator? Here are a couple more things you might want to know.
What are the four options of the type tool in Illustrator?
There are actually more than four type/text tools in Adobe Illustrator. The options for type tool are: Type Tool (Horizontal), Vertical Type Tool, Area Type Tool, Vertical Area Type Tool, Type on a Path Tool, Vertical Type on a Path Tool, and Touch Type Tool.
How to make text follow a path in Illustrator?
You can use the Type on a Path Tool to make text follow any path you create. Simply select the Type on a Path Tool, click on the path where you want the text to be, and replace the Lorem Ipsum dummy text with your own text.
What will change a point type text area to an area type?
When you choose the Type Tool in Illustrator, if you click on the artboard to add text, you’ll be adding point-type text. But if you click and drag to create a text box, you will create area type, which is also called area type text.
How do I make text go around a circle in Illustrator?
You can create a circle, and use the Type on a Path Tool to click on the circle. You will see text following the circle path, so simply replace the text with your own.
Wrapping Up
If you want to create a simply InDesign style text layout, you know what tool to use – The Area Type Tool! Again, make sure that when you add text to the shape, you’re clicking on the shape path instead of inside the shape, otherwise, the text won’t wrap around the shape.